Wednesday, December 28, 2011

Binding, the First Time


Woohoo, the quilt is finished at last (OK, with the exception of a few threads to clip and the embroidered dedication)!  I have layed it out on my bed because my son's is too hard to photograph.  The most intimidating part of this process for me was the binding.  I have placed some kind of 'binding' around my art quilts before, however, I invented my technique up as I went along.  I did not want to ruin my son's quilt after sooo much work, so I decided to sew an official binding and so looked into a couple techniques. 

The first one I explored I sewed on this practice quilt my little girl's doll.  (This doll belonged to my sister when she was a little girl.) I tried to follow the Missouri Quilt Company's binding instructions, changing 1/4 inch seam to 1/2 inch, but frankly I was too impatient to hand sew the back and figured there was no way I would hand sew my son's giant quilt.  And look at those corner--sheesh.  I'm not too happy with how it turned out but at least it is just a doll quilt--not too much at stake here.
I ended up using a suggestion from Inge, the woman who's longarm quilted my son's quilt together.  The binding is made from 3 inch strips of my chosen border materials (two different fabrics.)  I ironed the material in half length wise, then opened it up and folded the sides toward the middle leaving a small gap.  I then ironed the folds down, I closed the folds and ironed the fabric down the middle again.  I then capped that folded fabric over the edge of the quilt and could sew both sides of the binding on in one go.  The other piece of valuable advice I received from Inge was to sew the binding beginning along the side rather than at one of the corners.  That certainly made piecing the binding tails together easier.  I used Missouri Quilt Company's corner technique. 
I have promised each of my children a quilt.  An have begun working on my daughter's already.  I am sewing them in order who's birthday is coming next.

Thursday, December 1, 2011

First Quilt Top Complete!


My oldest son has an ancient blanket that he has had since he was a toddler.  This blanket is now threadbear and the binding is coming off.  I spoke with him and he agreed to replace the blanket with a new quilt.  This a big step for him since he doesn't like to get rid of anything.  It is also a big step for me since have never made a traditional quilt.  I decided to do a simple color block design.  I made a 7 1/2 inch square cardboard template and calculated how many squares I would need for a quilt top.  My son went through my fabric stash and picked out his favorite fabrics.  I also let him select 5 fabrics from Spoonflower (who is having a sale this week-2 fat quarters for the price of one!) and added 2 of my own design.  He choose a zoo/safari theme.
When I measured the top, bottom and middle of the finished squares to calculate my border, I was very pleased that there was less than an 1/2 inch difference from top to bottom.  I plan on sending the layers out to get quilted--I don't think I am ready for that step yet.
I had big help from my housekeeper, Margaret, who washed and ironed fabric and traced out some of the squares.  I found the videos by Missouri Star Quilt Co very helpful for a beginner like myself.

Tuesday, November 22, 2011

Tie Dye Party

I enjoy doing all kinds of fabric arts and I really enjoy sharing them when I can. Last weekend we invited several families over and had a tie dye party.  As has been said many times before by other people, when you teach something, you also learn.  For the party, I looked at several Youtube videos to broaden my tie dye design skills.  I can recommend videos by colorfulsteve such as this one on how to tie dye a heart design.  If you try to dye a shape, be very careful to fold your fabric in a straight line.  This is easier if your shape is large and bold.  Steve suggests outlining your shape with a dark color.  This suggestion helps your shape have definition.
To the right is my oldest and youngest in thier tie dyes.

Monday, November 7, 2011

Merbaby ATC swap

I am hosting a Merbaby swap on Swap-bot.  The sign-up is until December 9th and the last date to mail the cards is January 9th.  The swap entails creating two ATCs, one for each of your two partners.  I am not fussy about which technique you use but I do expect people to make the best cards they can. This is a great swap to participate in if you need a quick craft to do during the holiday season when you are at home.  Hope you join me!   For more information on Artist Trading Cards and what they are go here.

Sunday, October 30, 2011

The Message 2

I really enjoyed making the last ATC and felt that there was more to the image in my mind.  I have changed the format from the standard ATC size to allow more complexity.  This piece does not have the Swap-bot mascot since it is not for the official swap-although I think I may send it to my partner.  Like the last card, it is a combination of hand painted and commercial papers, cut collage style. 

Friday, October 28, 2011

The Message & Curiosity

I am not doing too many swaps these days but I could not resist the 100,000th swap on Swap-bot.  It has over 600 participants all over the world.  The only real requirement is that your handmade piece of swapable art must have Ernie, the swapbot mascot it it.  I hope my partner likes her ATC.  I call it The Message.  Below is a card I made a while back for a Steampunk swap, I call it Steampunk Curiosity.  Sadly, it never reached it's intended recipient.  Darn South African mail!

Tuesday, October 18, 2011

Fabric Yardage


I am very excited to share my fabrics finally printed on a yard.  The yellow, Big Five Dots, and the green, Big Five Babies on Clothesline were created to coordinate.  I orginally created Big Five Babies for the Project Selvage competion.  The pink design, Protea Petals Pink, is one of the ideas I have for floral based patterns.  I will be using this fabric to test some diaper cover designs.  I also will be adding some fabric squares to a quilt.

Monday, October 10, 2011

New Napkins

I have been using cloth menstrual pads for a while now.  They are more comfortable, environmentally friendlier and more economical in the long run that disposable.  The ones I own are great but I was still relying on disposable for overnight because I had not yet purchased any of that size.  Well, instead of buying, I decided to make my own.
I looked at flannel at the store but realized I already have plenty at home.  I have some old flannel receiving blankets that even my baby girl has outgrown.  The great thing about using these is that I would have probably thrown them away thinking no one would likely want old spit-up stained blankets. Additionally, they are very soft from use and washing.  My inserts are made of old toweling and even my template is cut from recycled cardboard.  (The cardboard was narrow and that's why the 'wing's need to be extended out.)
For heavy overnight conditions, I drafted an extra long pad.  My template utilizes the 'wings' design to hold the pad in place.  When I was satisfied with the dimensions, I traced template on the wrong side of folded flannel, taking care to extend and round out the 'wings' and cut out the pieces. ( I would recommend extending the 'wings' so they would cross the entire width of the pad.) The slit for the pad insert should only be traced on one of the 2 flannel pieces.  I first sewed around the stuffing slit and then sewed the two pieces, wrong sides together using a zigzag stitch, although it might be easier to sew the pattern and then cut out the pieces.  A serger would be very handing sewing these if you have one.  I then used a straigh stitch on the wings.  I used conventional snaps on the wings (not pictured.)  I placed them by experimenting with the fabric in hand.
The insert is just toweling cut out in a square about an inch shorter than your pad.  I then folded the outsides right and left edges 1/2 way to the middle and then folded it in again making a long rectangle as seen above.  I then zigzag stitched around the open edges. 
The free pattern is at the end of this blog entry.  
If the idea is interesting but you are not ready to sew your own; Glad Rags is a fine company to purchase ready made napkins.

Saturday, October 1, 2011

Life & Death

Life and Death.  OK, so really this post is not so dramatic as that, those just happen to be the themes of today's ATCs.  The top card is "My Favorite Perfume" which is based on Garden Path with Chickens from The Salon, Exhibit II series of perfumes, which is my favorite BPAL (Black Phoenix Alchemy Lab) scent.  I love their perfumes.  Some of my favorite are Hetairae, Jezirat al Tennyn, and ITASÔ KANSEI NENKAN JORÔ NO FÛZOKU.  They have many traditional kinds of perfume and many which are not.  All of there perfumes have literary or artistic allusions.  I also love their t-shirts.   Back to the card, the base is commerially painted bronze paper that I painted metallic green leaves on to give depth.  I then created a composition with paper flowers, focusing on the jewel tones.  I drew and glued on a little sexy fairy to roll around in the garden.  Garden Path with Chickens is a green, floral perfume with a salty, sexy smell.  Mmmmmm.
The death images were created for a Day of the Dead swap.  The skull on the black background was the original card I sent to my swap partners.  Sadly, those cards were never received--true for about half of the items I mailed through the South African postal system.  The cards with the red border were the replacements.  The black original background and the new red border are both flocked (velvet) paper.  The new card has a black commercial paper layered over.  The skulls are hand drawn and cut out.  I then stamped them and added further embellishments with rhinestones and colored pencils.

Wednesday, September 14, 2011

One Year Later

View of downtown with Jacarundas in bloom
So, here we are, the first anniversary of my arrival in South Africa.  It seems time to write down some of my observations about this country.

Pretoria (Tswane) is a town with many different peoples.  There are the locals plus the very large diplomatic community.  Still, Pretoria’s white population is largely Afrikaans.  The Afrikaners have been very friendly to my husband and me.  They are quite helpful and also very free with their opinions.  It is always insightful to hear what they have to say.

My husband and I do not get much contact with black South Africans.  Most of our interactions are formal and work related.  I have found out that it is very important to spend a couple of minutes asking how the person is and about their family before conducting business. Even on the telephone with a customer service person.  Anything else is considered rude.  Aside from these pleasantries, in my experience, most black South Africans do not like to share.  Other black Africans are talkative and tell me all about their culture, customs and opinions.  I am wondering if this is one of the legacies of Apartheid.

American entertainment is worldwide.   And people believe it is real.  Hey, it must be true if it is on a reality program, right?  How about those talk shows? Luckily, there are enough Americans here that I can point out that we are not all like that.  Jersey Shore is very popular here; I get asked about it frequently.  I hear Jerry Springer mentioned a lot too.  And everyone believes Americans are all rich.  I think that is a worldwide myth.

South Africans like babies.  I realize a lot of the world does but my little girl gets fawned on everyday by all kinds of people.  Many Americans act like they would rather not see or hear about your baby unless they have one themselves.

South Africans do not put up good signage.  They seem to think everyone already knows where everything is.  If you are going to an event you are lucky to get an address.  Even festivals may not have signs—or if they do, it might not be near the entrance, turn-off, etc.

You can get most things here that are available in the States.  You will pay, though.  About twice as much for toys.  Maybe 50% more for clothes.  Cosmetics and toiletries are also almost double the price.  Automobiles and gas are crazy expensive.  Restaurants and services are generally cheaper.  Private medical care is excellent and cheaper than what you would pay in America.

South Africans are proud.  And they should be.  They have accomplished a lot and they have a beautiful country with an excellent climate.  They are beginning to be environmentally conscious.  The wine here is very good.  We have met many, many entrepreneurs.  They are also realistic about their challenges.  There is still incredibly high unemployment.  Crime is violent.  There is a lot of theft.  But the mood of the country is mostly optimistic.


Speaking like a local:

American                            South African (English)

Trunk (of a car)                   Boot

Crazy                                     Boss

Sweet or nice                       Lekker

Cart                                       Trolley

Elevator                                Lift

Soccer                                   Football

Aaaw! or Cute!                    Shame!

Really?                                  Is it?

Gas                                        Petrol

Truck                                     Bakkie

Sneakers/Tennis Shoes     Tekkies/Tackies                               

Sheesh! or Geez!                Eish!

Barbeque                             Braai     

Ganster or Hoodlum          Tsotsi                   

In a while                             Just Now

In a minute/Soon               Now Now

Traffic Light                         Robot

Tuesday, September 6, 2011

Jewelry Making with the kids

My boys and I embarked on another art project.  Most of the projects we do really have to take no more than a couple of hours or they loose interest.  Jewelry making can be a very satisfying short term project.  In this case we decided to make birthday presents for my sister.  My seven year old boy came up with the idea.  He loves any excuse to visit the bead shop.  
At the bead shop, he and I collected our beads while my oldest ran interference with the baby.  I was selecting beads to make a bracelet similar to one I 've made before that is much complimented.  My boy just knew he wanted to make a long, blue necklace.
After dinner, we settled down to make the jewelry and my nine year old boy decides he wants to make something too.  We dig around my stash and he decides to create earrings.  (I have never made them before.)  I am quite proud of the boys.  Hope my sister enjoys her new jewelry.


Friday, August 12, 2011

Strength

I have been working on two art dolls with polymer clay faces.  The first of these dolls that I have completed is titled, ‘ Strength.’  I tried to approach the theme on many levels.  Her torso is hand printed Kona cotton, from my gelatin printing session.  I have embroidered the rune, strength, on her abdomen and have sewn garnet and agate beads, historically aligned with physical strength along the base of the torso.  I speculate that garnet and agate were symbolic for physical strength based on their likeness to blood and bone.  Her limbs are created from a stick pruned from one of the trees here.  I used the tree to represent the rooted quality and flexibility of a tree despite strong winds and rains.  The stick also doubles for her backbone.  A strong backbone is crucial for any character of strength.  I used a beaded fringe around her lower leg with green hearts for growth, love and compassion; all additional ingredients for strength. 

The figure’s face and feet are sculpted of rose colored clay and painted with opaque and translucent acrylic paints.  Her eyes and lips were then painted with high gloss varnish.  I felt the feet were a very important feature, not only to serve as a base for the doll to stand by but also as an expression of strength.  Feet are muscular, they connect directly to the earth and move us through life.  Feet do a lot of work and so are very representational of strength to me.  Strength’s hair is handspun wool that I picked up in Virginia at a fiber shop that is sadly now out of business. 

I really enjoyed creating this figure.  She is much more abstract than most of my art dolls. 


Wednesday, August 10, 2011

Family Life Update

I haven't posted for a long time because the neighborhood telephone cable was stolen.  I had no local phone line and no Internet for two months.  The timing was really unfortunate since it coincided with the end of the school year for the children.  I had plans for them on the Internet!  As people say, this is Africa and sometimes these things happen.

What has happened in the last two months?  We went back to America and visited some of our cousins on my husband's side.  We got to meet our newest baby cousin, who was only nine months old. We visited Cape Cod and hung out in Boston.  There was a real heat wave with a heat index topping out at 105 F.  In South Africa, it was topping out around 50 F.  Even with the body melting weather, the cousins really loved seeing each other.  I wish I could have seen my side of the family as well but they live no where near Massachusetts.  Next year.

While in America we ate great volumes of junk food that we missed like: Chinese chicken nuggets (aka General Tso's chicken,) Dunkin Donuts Boston Creme donuts, bagels with cream cheese, Cape Cod fudge (from the Fudge Factory in Providence Town- best place on the Cape,)  pizza, burritos, Tostitos and ice cream.  I think we all gained a few pounds.

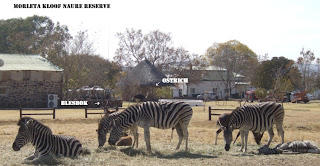
Back home in South Africa, the children and I kept ourselves busy at the zoo, playing, and visiting parks.  One of our favorite parks here is Moreleta Kloof Nature Reserve.  It is near our home and has a lot of wildlife. We usually see ostrich, zebra, blesbok and springbok strolling about every time we visit.  You don't even have to go to a game park to get some great wildlife views here. 

We are looking forward to spring and hopefully some visitors in October and December.

Friday, May 27, 2011

Women ATCs

These ATCs were created for Swap-bot's Free Theme ATC.  I started playing around with some cutouts from stencils that were painted with acrylic paints when I did the gelatin monoprints on a commercially printed floral-paisley print.  Once I laid out the cutouts I selected some women's faces from Dover's Women in Illustrations Clipart book that I had previously colored and cut out of cardstock.  I felt another element was still needed so I selected a bird themed stamp.  Each card then got a couple of finishing touches.  The top left is titled, 'North Africa', the top right, 'Pakistan' and the bottom, 'Leta and the Swan.'  I hope my swap partners enjoy them.

Tuesday, May 10, 2011

Dragon Fairies and Dr Who

What do they have in common?  Not much, they are just the current subject matter of my most recent ATC's.  The Dragon Fairies swap theme was just that but the the Dr Who card is for a steampunk swap.  The dragon fairies are supposed to be a hybrid creature.  I drew a few prototypes and realized they were all male.  That is when the couple below evolved.  The Dr Who card happened as I was looking around the Internet for some steampunk machines and found Alex Holden's Steampunk Dalek and thought it was perfect for my peering Victorian gentleman.  My image is enchanced by minature brads.  (And by the way, this season of Dr Who is one of the best so far, even if my heart still belongs to David Tennant.  OK and this week's episode is written by my favorite writer, Neil Gaiman.)

Friday, May 6, 2011

Gelatin Printing On Fabric


Today Beth (who wanted to remain faceless), Maureen, and Janalee came over to investigate gelatin printing with me. Beth and I prepared cookie sheets and pie tins of gelatin last night. This morning when we began we had some difficulties. While, it was not too hard to remove the gelatin from the pie tins, it was practically impossible to get it it out of the cookie sheets in one piece. We decided to leave the gelatin that was in the cookie sheets and work directly from the tray. We used foam brushes and brayers to apply water soluble fabric paint onto the gelatin's surface and then layered stencils, paper cutouts and plant materials over the paint layer.

     
We printed on prepared for dye cottons (fabric from Dharma.) Lay the fabric on the paint and press your hand or hard brayer over the fabric.  The picture on the left shows two layers of paint and you can see the brush marks and stencils clearly. 


This image is a 'ghost image'.  That is, the paint that is left over after the first print and the stencils are moved.  The stencils can be flipped, and repositioned.


When you are done with your original and ghost, just wipe the plate gently with a damp paper towel and on the the next image.
  
Here, Janalee used one of her stencils as a stamp.  She painted it orange and then rolled the brayer over it. 


  Eventually, the plates fall apart.  I had a lot of fun.  The process is very tactile, a little messy but inexpensive and requires little special materials.  I think I will try it with the kids when they come home.

Further resources:  Pokey Bolton of Quilting Arts has a great 'how to' blog article.  Linda Germain has very good video on Youtube on gelatin printing on paper below. 
 

Monday, May 2, 2011

Tree Topper Doll

This has been a good year for catch-up.  I have been completing many projects that were put on the back burner last year because of moving and a new baby.  The most recent project I have completed is Leta Benedict's Tree Topper.  This doll is made with no legs but has a way to attach the doll to a tree or her stand.
I have significantly changed the costuming of the original pattern and added wings.  Her costume is an amalgamation of Medieval and Renaissance elements made from silk, velvet and bits if lace and trim.  I have also beaded a crown over hair made of soy roving.  All of her costuming is hand sewn.  I haven't decided what she will hold in her hands yet and welcome suggestions.  I hope she will become and heirloom of our family's holiday decorations.

Thursday, April 28, 2011

Mermaid ATC

This Mermaid ATC is for a resend.  All of the items I mailed that day through the South African post have disappeared.  This mermaid is in colored pencil with glitter paint.  She is based on a contortionist.

Monday, April 18, 2011

South African Fashion I


South Africa is called the Rainbow Nation because of all of the different peoples that live here. This post highlights the fashions of a particular people, the Afrikaners. The Afrikaners are the descendants of primarily Dutch peoples who have lived in South Africa since 1652 but spread through-out South Africa in the early-mid 1800.


Women wear youthful, feminine, layered clothing. Skirts with leggings or a wide-leg pants are popular. Clothing materials feature a lot of flowing fabrics such as jersey and velvet. Sheers are very popular as well--lace, tulle and organza. The effect is very lovely.  In the pictures above, women from the shop Signorina's exemplify the autumn version this style.  As for shoes, ballet flats are quite common and until recently, Roman sandals were everywhere but the change of the season has brought out knee high boots in full force. Most women also are carrying very large baggy purses.


Men's clothing tend to be skinny pants, fitted shirts--jersey or button down and scarves are popular--even before the weather grew chilly.

Hair dye is very popular with both men and women. Bold black and blondes seem to be the most popular colors. Foiling is frequently seen. Women put a lot of thought into their hair whether short and asymmetrical or long and layered. Men's hair is short and spiky with a slight mohawk feel or cut close to the head.  Click this link or this one to see some realistic hairstyles.

Friday, April 15, 2011

Snowy Owl ATCs

The weather is getting cooler here in South Africa so I was inspired to do more wintry themed owls.  These ATCs are drawn entirely in colored pencil.  Both owls are North American species.  The owl on the left is a Snowy Owl and is after Stow Wegenroth's Matriarch.  The owl on the right is a Barred Owl. 
You can see a copy of Wegenroth's print Matriarch at the Old Print Shop (bottom of the page.)  As an aside, I was offered a job at their Georgetown location when I was working at Creighton Davis Gallery


Sunday, April 10, 2011

Weaver Bird & Nest

This is second in the series of bird stamps I am creating.  The first was the Scops Owl and this is the Weaver bird with its nest.  I photographed this bird on my street when I just arrived in September (spring in South Africa.)  The Weaver bird has a bright yellow mating plumage and this one was near its nest in a Fever tree.  The artist trading card is the stamped image with color pencil.

Wednesday, April 6, 2011

On a bit of a roll


Two more ATC's.
 
The top is colored pencil and ink on layered tissue paper over recycled junk mail.  The recipient in interested in Ancient Egypt so this is Sehkmet breathing on a representation of Ib--one of the 5 parts of the soul representing the heart.  The ATC on the right is based on a vintage artsy nude with collage, colored pencils and beads.  The words on the card are Who is this flower before me?  And what is the work of this God?  It is taken from a prayer known as the HA prayer.                                                

Tuesday, April 5, 2011

Owls & Project Selvage Update


These are North American owls, the Eastern Screech owl, and the Northern Saw-whet owl.  These ATCs (artist trading cards) are watercolor and pen drawings.
I didn't make it as a finalist in Project Selvage.  It was not surprising to me once I looked at the body of 968 entries.  I will keep on working on my fabric design to bring it up to the level of the finalists.  Tami Levin of my online doll-making group, DollStreetDreamers, did make it as a finalist.  I hope you take time to vote on the entries.  Make sure you also check out her beautiful art on her blog.

Tuesday, March 29, 2011

If Venus of Willendorf were a paper doll

I have joined another Swap-bot swap, this time, a paperdoll with the theme Earth!  Immediately, I thought of Venus of Willendorf (see inset.)  She epitomizes Earth for me, but then I thought what would she look if she were modern? 
She is made of hand-made paper painted with copper paint which should develop a nice patina over time.  I then added details with gel pens and acrylic paint. 
As I was designing this doll I began to reminisce about my mom.  Every year when I was a little girl and the Ms Universe pageant was on TV my mom would paint our nails and we would wear our best dresses.  She also made my sister and I voluptuous paperdolls on cardboard and designed them dresses from flocked wallpaper.  The dresses were gold, ruby red and sapphire blue.  I decided that in honor of my mom, I would give my earth mama seasonal outfits.  All of the outfits are made from commerical scrapbooking papers with additional details, like the faux fur trim on the winter snowsuit or the lace on the summer frock.


Sunday, March 27, 2011

Market Finds

This weekend my family went to the Irene Market rather than our usual trip to the closer Hazel Food Market.  Irene is a larger market in the town of Irene similar to an art fair in the United States but with way more food vendors.  I would definitely recommend paying a visit if you want to bring home some souvenirs from South Africa or are just looking for a great place to get gifts. 
ENDLESS POSSIBILITIES
While there are several talented artists at Irene Market, the work of Michelle Penny of Gallery Seven caught my eye.  Her painting, Endless Possibilities, used with permission, is a sample of her work.  You can see Penny's palette is vibrant and her subject matter reminiscent of Marc Chagall.  While his work was about love and longing, Penny's subject matter is a more humorous and theatrical take on intimacy.  I will need to make a spot on my wall for one of her paintings. 
Another item that really caught my eye was the super cute hand-made leather shoes of Suki Shoes.  They make shoes for babies and toddlers and I had to get a pair for my little girl. 
The ceramic tiles of Tiled Tapestries turned my head because they reminded me very much of a cheerfully colored version of my treasured Motawi tiles.  The hand-made beads on the bracelets of Piccolo Jewellery & Glass were exquisite.  I also found out they have beadmaking classes not too far from my house.   
There are certainly other great finds at the Market I just wanted to share a few of my favorites.